I am sorry to all of you that have my blog bookmarked in your computers.
My blog has a new home.
http://travisldyck.wordpress.com/
This is due mostly to the fact that I have not been able to sign into my blog for the past week.
Thursday, June 2, 2011
Saturday, May 28, 2011
Cornbread
A year ago or so I came into possession of 2 cast iron frying pans and since that point I have been wanting to make some corn bread. I have made cornbread before but there's something about having it baked in a cast iron frying pan that seems right.

Before I made the cornbread I first had to season the pans, which from non use had become a bit dry and was speckled with rust. I was initially afraid of this process but after doing a bit of research I found it was quite easy. I scrubbed the pans clean, and coated them with oil inside and out then placed the pans into the oven upside down on baking sheets and baked them for 3 hours at 250.
Cornbread (Adapted from Rebar's plain and fancy cornbread)
1 C Cornmeal
1 C Flour (Whole Wheat)
1 tsp Baking Soda
2 tsp Baking Powder
1/2 tsp Salt
2 Eggs
1 C Milk
1/2 C Butter (Soft)
Juice of a lime
Mix everything together and then bake in a cast iron pan (9 inches round) or an 8x8 baking dish at 400 for 20 to 25 minutes.
Saturday, May 21, 2011
Update
So, it's been a little while since I last posted. I assure you that I have in fact been busy (At times). In the past few weeks Teegan and I have made several trips down to Regina to set up life/job and my garden plot (Pictures below), I have been packing (Move day is tomorrow) and in the last few weeks I have found myself busy making and refinishing furniture (Because one must have something to put a TV on!)
2 nights ago I made some BBQ pizza and I couldn't have been happier with the results (It makes me sad that this was the first time I have ever tried it)!


Once I found out that I did in fact rent a garden plot I started another tray of seeds - even though most of these seeds don't need an inside start, I decided I would give them a head start (Zucchini, cucumber, mint, catnip, etc.).

This sideboard (Which is going to hold my TV), is currently a gardening table allowing my little seeds to get sun all the day long. The sideboard was initially a full kitchen table, but I ripped it down, glued it together and sanded it thinking I was going to give it a coat of paint, but my mother in law wouldn't have it - informing me that distressed furniture is quite popular these days. So for the time being it will look like this.

My garden plot is about a 5 minute drive from our new place. I went down earlier this week to plant everything but things took a little longer to get going then I thought. The 2 biggest struggles were getting my plot tilled and fighting the wind (Which did eventually win the battle). I left my plot there to sit until my return (Probably Monday), 10% planted.

Friday, May 6, 2011
Slowly but surely!
Good news - I am pretty sure I have managed to reserve a spot in one of the community gardens in Regina. It'll will be at 45 x 25 foot plot, which will give me lots of room to grow and experiment. Seeing as this is my first attempt at a serious garden I am looking at this year as a practice round! I am going to see if all the weird veg I got will actually grow here (Seeing as they probably has a different planting zone preference). I also want to see if I am going to be able to manage a plot of this size (ideally I would have a number of plots, but will start with one).
As of late my 2 little trays of sprouts are probably get way to much attention, and with a garden my sprouts will be left mostly to there own devices (Which is probably a good thing - I imagine I hinder growth more then I help it along).
Almost all of my seeds have sprouted (Besides the half a dozen lazy pea seeds). I have thinned my Swiss Chard and Arugula and for the most part they are doing well in the bigger cups (I do intend to sow seeds right into the ground as well but this will give me a few earlier rounds of salad.)
My Peppers took a long time to come up and for a while there I thought they were all going to be duds (They are the smallest ones in the peat pellets.
The Basil is growing slowly, but they are quite hardy so I have no nerves about them dying off.
The peas like I said are being lazy. I have 5 out of 10 peat pellets with sprouts. I consulted the website I bought them from and it does say they have a lower germination rate. I am quite excited to grow these little guys.


Tuesday, May 3, 2011
Beer Butt Chicken!

I picked up a few whole chickens the other day and decided they would be best done on the BBQ. So after a little scrounging I found a really bad bottle of beer (Which will remain nameless) that a previous guest had brought over and left (Who will also remain nameless). I then rinsed out 2 pop cans and divided up the beer into both (Though I did wonder what chicken would actually taste like steamed with a bit of Coke - perhaps an experiment for another day).
I made a spice rub, which contained:
Paprika
Chili Powder
Onion Powder
Garlic Powder
Salt and Pepper
Cayenne Pepper
And Brown Sugar
I found the chicken is quite stable on a can if on a flat surface (Though you can buy holders for 10 dollars a piece - which to me seems steep). I cooked the chicken with indirect heat and tried to keep the BBQ at a temp of 350. Your chicken is done once it reaches a nice internal temp of 180.
The side of potato's (Next to chicken), were cut up into small pieces and tossed in Sumac, Thyme, Salt and Pepper. Once all the potato's were resting in the tin foil I laid a few pieces of bacon over the potato's and wrapped with more foil (The only thing that could make potato's better is bacon fat!). Cook till tender and bacon is cooked to your preference (about 30 minutes or so).
Thursday, April 21, 2011
Starting Seeds
Even though spring is taking it's sweet time making it's way to the the prairies (Or so people tell me), a few days ago I decided to start some of my seeds (Indoors). I have been a little eager ever since I got my seeds in the mail a number of months ago.
I planted seeds into 50 peat pellets - which I now think will be far too many - seeing as I don't have a place to live starting in may (So if anyone knows of a nice place in Regina for May 1st or the 15th - let me know!).
10 Pepper plants
10 Winged peas
10 Basil plants
10 Arugula plants
10 Rainbow Swiss chard

After 3 days - Arugula are the only sprouts showing up.

Stayed tuned to see where these little guys end up.
Sunday, April 10, 2011
Sausage

15 pounds Pork
15 pounds Beef
30 T curry powder
15 tsp cinnamon
15 tsp salt
15 tsp pepper
3 bulbs of garlic
2 bags of purred sun-dried tomato's
All the spices were supposed to be double what I added (Besides the garlic/tomato) - but to be honest I got a little scared the flavour would become to intense. This way I know I am going to be able to taste everything and if it's a little on the tame side - I will know that next time I can go full board.

My hands a full day later still look jaundice.

Stuffing the cavity with the sausage mix.

While I was busy prepping, my father was cleaning up (sorting) some of his earlier work from the previous day.

Cranking the sausage out has always been my favourite part of the process. Except I remember getting to turn the crank, not guiding the sausage out. Traditions being past on - I guess.

3/4's of the way there.

My Dad showing off the skills he learned a few decades ago (As a butcher). He started off slow but once his hands remembered what they were doing he churned this out in a few seconds.

Getting ready for smoke.

My Fathers smoke house. Which has seen use.

I will add that the pictures were all taken by Teegan who wasn't initially to pumped to come out to the shop for the process. I will tell you that she did in fact thoroughly enjoy it.

The final product.
I BBQ'd some up this evening and I am happy to say that it was good.
Nothing was overpowering and everything seemed to be pretty balanced. Perhaps I would cut back a bit of the cinnamon next time - or add a bit of sweetness but all in all I am content with my product.

The final product.
I BBQ'd some up this evening and I am happy to say that it was good.
Nothing was overpowering and everything seemed to be pretty balanced. Perhaps I would cut back a bit of the cinnamon next time - or add a bit of sweetness but all in all I am content with my product.
Monday, March 7, 2011
Hiatus
For those of you out there who read my blog, I will be taking a bit of a break - most likely a month or there about. Teegan and I our finding ourselves (once again) in a time of transition, and my supplies and time will continue to dwindle as the month rolls on. So more then likely the next time I blog, I will be back in my homeland of Saskatchewan and hopefully I will be bringing this Ontario weather with me!
Wednesday, March 2, 2011
Bbq - Baa!
Very rarely do I purchase lamb - In fact I can count the number of times it's seen the inside of my shopping bag on 2 fingers - I should also point out that today was that second finger (Lamb blade chops!).
I marinaded the 2 chops in a oil, lemon juice, balsamic vinegar, garlic, dried oregano and S/P.
After letting it soak for a few hours in the fridge I decided to brave the -13 temperatures and start up the BBQ. I was a little chilly, but completely worth it.
I paired the chops with some millet which I ended up cooking and then re-frying with some spinach, cranberries, almonds - seasoned with a bit of cumin and cinnamon - and topped with some goat cheese.

I will be buying more lamb!
Thursday, February 24, 2011
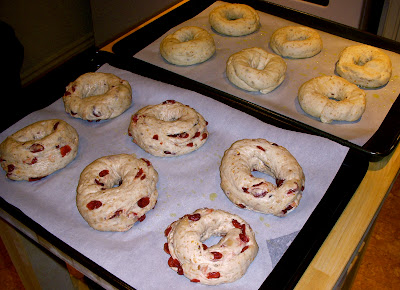
Bagel's!
Yesterday, for some reason or another I had the urge to make bagels. So I went to my Peter Reinhart book and proceeded to peruse his recipe. After reading the recipe and his variations I couldn't decide whether I wanted to make a plain old bagel or a cranberry cinnamon bagel. The only logical option was to make 2 batches (Which is only a dozen).
I have found a blog with the whole recipe in detail (Here).


I have found a blog with the whole recipe in detail (Here).

Waiting for a bath.

In the bath (3 liters of water, 1 T baking soda, 1 tsp salt, 1 table cane sugar)

Out of the oven.

I enjoyed this process, more then I thought I would - it was very rewarding, as was my sandwich (Garlic Mayo, mustard, smoked meat, lettuce).
p.s. I did not use Malt barley syrup - honey or sugar would suffice.
Sunday, February 20, 2011
Coconut Chai
A little twist on a favourite.
The Recipe
A thumb piece size of ginger chopped
6 cloves (crushed with the side of a knife)
10 cardamom pods (crushed with the side of a knife)
1/2 tsp black peppercorn (or ground - but it may be a little more spicy)
1 6 inch piece of cinnamon (broken into small pieces)
The new addition
1/2 c of toasted coconut
3 tsp orange pekoe (loose leaf, or 3 to 4 bags)
Add all the ingredients into 4 cups of water and simmer in a pot on a stove for 30 minutes (You could leave it longer for stronger flavour). Add the tea and let it simmer for a few more minutes. Then strain everything, transfer back to the pot and add 1 cup of milk. At this point you can take it off the heat, or you can leave it on for a few minutes till it reaches your right temperature.

I should say, that 1/2 cup of toasted coconut seemed like a lot to me, but I assure you that you will need a least this much. If you want a stronger taste go ahead and add more. I have also thought about adding coconut milk, which I may try in the future.
Monday, February 14, 2011
V-Day Supper (Pizza)

This was supposed to be a heart - but my the rise of the crust, kind of kiboshed my plans.
Nothing says "I love you" more then pizza! Well in my world anyways.
I was perusing through my previous pizza posts and I soon realized that I no longer make pizza like I used to. My former go to pizza dough recipe has fallen by the wayside, and I am now aware of its shortcomings.
Here's one of the new recipe I use.
I should say that it's loosely based on Peter Reinhart's Napoletana pizza dough recipe.
Here's one of the new recipe I use.
I should say that it's loosely based on Peter Reinhart's Napoletana pizza dough recipe.
5 cups unbleached high-gluten, bread, or all-purpose flour
I usually sub in 2 cups of multi-grain bread flour
1 tablespoon coarse kosher salt
1 teaspoon instant yeast
2 cups plus a few extra splashes of water
You could also add in some olive oil (about a 1/4 cup)
You could also add in some olive oil (about a 1/4 cup)
Stir the yeast into the water and let it sit for a few minutes till dissolved or until foam develops - then add the water/yeast to the rest of the dry ingredients, which by this point have been stirred all together (I like to use a whisk). Then stir everything together for about 3 minutes till you end up pushing a ball of dough around the bowl. Once it's at this point knead it for about 30 seconds or give it a stretch and fold (I prefer this - here is a quick video if you have no clue what I am talking about - I should also point out that this pizza dough is not going to be nearly as soft/wet as the one in the video). Place in an oiled bowl and put into the fridge overnight (it can be kept like this for a few days).
On pizza day take the dough out of the fridge and cut the dough into smaller balls, depending on the size of pizza you want (I like 4 to 5). Once cut and shaped into little tight balls let the dough warm up, loosely covered on an oiled sheet for 2 hours before using.
At this point in the past I would bring out my rolling pin and start going at this dough with gusto, but I have learned the error of my ways (granted I would still roll if I was making a big pizza). I now stretch the dough using the back of my hands and thumbs. I can't find a good video of that, but basically you want more dough on the outsides of the pizza so you get a good crust.
I used to cook my pizza's at a temp of 350 - 400, but It's only as of recent that I have been brave enough to turn my oven to full blast. I don't think I would be that eager if I was using a normal baking sheet (which can warp and bend when heated to hot), but my pizza stone seems to thrive in the heat.
I don't know what's up with blogger so ignore, the weird spacing and text.
Sunday, February 13, 2011
Avocado Tree (2 months later)
Teegan and I went into Toronto yesterday to see some friends. We had a great time. First it was brunch at this fabulous little place called "Frankly". Imagine brunch infused with Indian flavours. I had a chick pea flour crepe with egg, potato, bacon and a hot curry sauce.
Then it was off to see The Bradford-Ewarts, where we had a nice supper - tapas style. Meatballs, fried rice balls (by Nick), Hummas (by Kimmy) and I made a no knead bread and a fennel/arugula and grapefruit salad.
Every time we get to visit them I am secretly eager to see what has become of the avocado tree. Here's a few pics.


Sunday, February 6, 2011
Waffles
Waffles are quite a big staple in my life (I am surprised I have never blogged about them). In the past few years they have been made almost on a weekly basis (Well not to much as of recent). I have even managed to pass on the love to my in-laws, which is good for several reasons - one being, I no longer the only one making them.
I have tried all sorts, including pumpkin, chocolate, gingerbread, blueberry etc - and even though some of these waffles were pretty awesome my favourite is still a classic with a bit of orange zest added in for flavour

Here's the recipe I use:
2 cups flour
1 3/4 cups milk
2 eggs
1/2 cup butter/oil (you can always use less)
4 tsp baking powder
1/2 tsp coarse kosher salt (or 1/4 tsp table salt)
1 T sugar
A slash of vanilla
Optional - the zest of an orange, lime, lemon, grapefruit.
Mix everything together.
Today for a topping, I cut up some apples, strawberries, raspberries, blueberries and cranberries and cooked them with a splash of water in a pot until soft. I added cinnamon and sugar till it was sweet enough for me - then I pureed it.
The whipped cream was basic, but instead of sweetening it with sugar I used maple syrup.
Tuesday, February 1, 2011
Knead - Not, Coconut Chocolate Bread 2 (Baked on a Stone).

After first rise - in a bowl.

After second rise - ready for the oven.

The finished product

Melted chocolate on the bottom of the bread.
I told you in my last attempt to make this bread that I would try it again on a stone. The bread turned out just as good in my opinion, though slightly different.
I got a better rise out of this bread then the last - but I doubt that had anything to do with the stone.
I used bigger chunks of chocolate, which I didn't like as much - I should have cut them smaller.
I also used sweetened coconut, last time I used unsweetened - which was better.
I baked it on the stone for about 30 minutes (Less then the dutch oven) until it reached an internal temp of 200. If you want the recipe, scroll down a bit!
Sunday, January 30, 2011
Pho
About a month ago - Teegan and I were whisked away to Kim's Pho (A little Vietnamese restaurant in Toronto - I believe that's what it was called), by a few friends. Even though I didn't partake in Pho that night, I tried Teegan's and became quite smitten - seriously good. To quote my friend Shez "Dee-freakin-licious".
So that being said, I thought I would take a stab at it. The recipe I used came from Charles Phan on the Food &Wine website.

It turned out pretty good. The broth had a nice flavour, which I was happy about. Adding the roasted ginger was new to me - but it definitely paid off. This may make a regular appearance in the repertoire.
Monday, January 24, 2011
My Future Garden
I got my seeds in the mail today! I am super excited - though, my excitement is currently being harnessed or reigned in. At this point, I don't know when or where my garden will be planted. Even if my garden doesn't make it into the ground this year - seeds keep for a few years - and I am really happy with my seed choices.
I got my seeds from The Cottage Gardener. They are located about 30 minutes south of Peterborough.

I got my seeds from The Cottage Gardener. They are located about 30 minutes south of Peterborough.

Longfellow Cucumber - 12 inches long - with white ribs
Beet Mix - it's got red, gold, orange etc
Aurora Pepper - I was quite taken with this pepper - it's also endangered
Kale - a mix of the different varieties
Golden Zucchini
Winged Peas - not quite peas, not quite asparagus
Watermelon Radish - green outside, red inside
Albino Beet - white beets - who knew!
Swiss Chard - 5 colours
Basil Mix - sweet, thai, lemon, lime
Arugula
Parsnips - my new found vegetable
Carrots - white, red, orange, yellow and purple
Thursday, January 20, 2011
Knead - Not, Coconut Chocolate Bread
I borrowed Jim Lahey's book "My Bread" from the library, a few weeks ago. As far as I know, he created the no-knead bread method. After perusing the book, there were a few bread recipes that stood out - but none more then the coconut chocolate bread (Click here for the recipe) or see below.

I cut into the bread before I took some pics - I just couldn't wait. I should tell you that within 10 minutes of the first cut, Teegan and I polished off over half this bread! SO - GOOD!
Recipe:
2 C + 2 T Unbleached Bread Flour
1/4 tsp Yeast (I used 1/2 tsp)
1 C Unsweetened shredded coconut
1 C Semi-sweet chunk'ed chocolate (I just had chips but I would have used a dark chocolate).
1 tsp Salt
1 1/4 C water
Throw everything together and stir till there is no dry flour left in the bowl. Once everything seems good cover it and let it rest overnight.
The next morning, scrape the dough out of the bowl onto a floured surface. Fold the dough over on itself a few times and then shape the dough into a ball. Put the dough onto a piece of parchment and put it into a bowl to keep the dough in a round shape. Cover and let it rest for 2 hours - or till doubled in size. Oh, sprinkle the top with a bit more coconut. I got a little carried away and some of mine burnt and I had to scrape it off.
Preheat the oven to 450. During this time also preheat your dutch oven. Once the oven is ready, place the dough (with paper) into the dutch oven (Be careful it's hot) and bake with the lid on for 30 to 40 minutes. Then take the lid off and bake for another 20 minutes or so.
I was initially going to make this bread on my stone but at the last minute decided against it. Though I still want to try it - so when I do, I'll let you know how it turns out.
Sunday, January 16, 2011
100th Post
It seems just like yesterday I was writing my first post. How time fly's.
This blog was initially going to be a way of keeping myself creative. I would do something and blog about it. Slowly but surely it became focused on food, and now more recently bread. I do have dreams to blog about my big garden that I have been planning and growing in my head - but that may have to wait a year or 2 till my life gets more settled. So stay tuned (Darren, Jen, Mom and everyone else who's reading!)
Meanwhile.
This is the sourdough waiting for the oven.


The sourdough bread to the left was made with yeast, where as the bread on the right was not. There was quite a difference in size between the 2. The bread with the yeast turned out great - it looked so nice, it has a good crust and crumb (The inside of the bread) and tasted great. The natural sourdough however, didn't really rise, didn't taste good, didn't cook all the way through and found its way into the garbage. Perhaps the initial starter was flawed, or perhaps my approach was - perhaps another try in the future.

The inside of the good bread.

I picked up some more bread flour today (unbleached and multi-grain), so I could finish the rest of my pizza dough (One with unbleached bread flour and the other with - you guessed it! Multi-grain). I ended up breaking both doughs down into 10 individual pieces and froze them for another day.
Tonight for supper I was going to make 2 bigger pizza's, but after doing a little research - I found out that in a normal kitchen oven, smaller pizza's cook better then bigger ones. So I made 5 individual pizza's (about 10 inches round). It took longer, but I was in no way disappointed with the results. In fact, this was the best pizza I have ever made!


After 2 minutes in the oven.
The temperature in the oven was set to 550 - as high as my oven goes.
The Pizza's cooked in about 5 to 6 minutes.

1. Buffalo Chicken
I mixed some Franks buffalo hot sauce with a little ranch and topped with some shaved deli chicken and mozzarella cheese.

2. Salami
Just pizza sauce and salami

3. Buffalo Chicken

4. Salami

5. Buffalo Chicken
p.s I once again have room in my fridge.
Subscribe to:
Posts (Atom)